Tuesday, December 16, 2014

Chai Gift Cards

This is an easy Christmas card and gift in one
  I dug out some card stock from my stash.


I headed over to The Graphics Fairy and had a look at her labels.  Thanks again Graphics Fairy.

  I found one that had tea
 written all over it...
"Galon de Coton" means "Drink Tea and Enjoy!"
If you do speak french just ignore that last sentence.
  I downloaded it, modified it to make it personal,  and printed four per page.
 I tore the labels with a ruler into equal sizes as  I didn't want the edges to look cut.
 (Actually my scissors were nowhere to be found.) 


  Each one was sewn onto a piece of card stock  measuring 4.5 x 6.5 inches.


I grabbed another piece of card stock, and sewed it onto the back, so that  I formed an envelope with a label on the front. 


Two holes were punched in the top.


 My homemade Chai was put into plastic bags from the dollar store and each card was tied with some ribbon.   To see my chai mix recipe, click H E R E !
I can take handwriting cards off my list this year.


enjoy!!!

Cheers!


Saturday, December 13, 2014

A Christmas Ornament Exchange and a Poem!

   Vicky from  "Life on Willie Mae Lane"  sent me these wonderful gifts!!
 She was also the one who coordinated this amazing exchange!  So much work.  Thanks Vicky.


Twas the night before gift exchange and all through the mail.

 Canada Post was still acting like  Silly Old Snail.
The packages  tied up with many a bows
And with all that excitement I stubbed my old toes.


With bells and buttons and ribbons and candy
I realized Vicky was more than just handy!
AWE!!

With wine glasses made into beautiful globes
They looked so fantastic  hanging in my abode.


With  beautiful Joy and a tree  full of glam
I looked for my scissors and saw a snowman

So cute.


A big jar of candy that brings such delight
and to all of my Bloggy Friends I wish you  goodnight!


Thank you Vicky!
Check out all the fun we had over at here at
Life On Willie Mae Lane
So thoughtful and so much fun!
Cheers.

Friday, November 28, 2014

I'm Dreaming of a White Christmas Tree

A packing peanut tree seems like a white Christmas to me.

Materials needed:
white paint and brush
dollar store light set (battery operated)
cardboard (cereal box style)
hot glue
styrofoam peanuts

 Create a cone from your cardboard.  Hot glue it into shape and give it a quick coat of white paint. 
 DON'T GET HOT GLUE ON FINGER AND THEN PUT YOUR FINGER IN YOUR MOUTH....JUST DON'T DO IT!!!

 The tricky part was trying to insert the lights into the peak of the tree.  With a lot of luck and pinched fingers from my small needle nose pliers, I was able to pull the lights through pre poked holes in the cone. 


 Then it was just a matter of gluing the styrofoam peanuts onto the cone. 

Thank goodness the lights worked......
Always check the lights
 to make sure they work before 
you put them in your tree!

To top the tree off, I used a silver star napkin ring.
To see my tree collection click here and here!

The result was a tree, numerous hand injuries
and no hot beverages for a few days! 

FA LA LA LA LA   LA LA  LA LA!

And for a little Coco Chanel
I base coated a second form with pink paint, applied packing peanuts, sprayed tree with some spray adhesive and sprinkled glitter down the sides.  Some dollar store jewels cascade down and dragonfly embellishments adorn the top....ahh COCO!


  Mr. FT calls me Sparkle and keeps slipping dollar bills in my stocking???
Cheers!
Partying with

Thursday, November 13, 2014

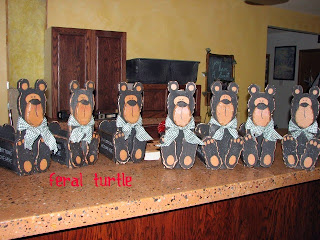
Solar Bear Family

This is a re-post of a post I did a few years ago because I have been too busy to post a new post.  In keeping with the spirit of posts, I thought I would re-post my Solar Bear Post post.


A picture of our unfinished kitchen too!


I was at a craft sale a few years back and shamelessly
 bought a bear magazine holder to copy.
  It was just so beary cute I couldn't resist.
  I built an army until they all turned on me.  Karma I guess, but whatever it was, I knew I had to get rid of the creepy little buggers cuz they just wouldn't stop staring. 
 Off to their new homes they went and off the names came on my Christmas list.
  I figure it would be safer if they were split up.
  
Material List:
2 - 1x6 spruce or pine board 5 feet 
1 4x4 post 30" long
1- 2x10 - 24 to 30" long
12" of 2x2 cut into three 4 inch pieces
Paint brush
Tan paint
Blush (optional)
2- 5" Lag bolts
6- 2 1/2" screws
18-1 1/2" screws
$ store scarf (cut into 3 scarves)
wood glue
or a jigsaw(if you are really motivated)
sander and sandpaper
drill bit and drill for solar light 

The pattern pieces were freehanded but I put the measurements under the pics in case you are interested in having your own family.
Bear heights are 24" 20" and 16"  and the width of the 1x6 boards


5" long by about 3" wide

About 7" long by about 3 1/2 inches wide

 
I cut bear bodies from one board and feet from the other.  The noses were cut from the scrap ends and the feet on a diagonal.  The pictured bears' body parts had been previously screwed.....that doesn't sound very good....what I meant to say is he had a previous life..let's just say I used a recycled board.


Sand all pieces; with "extreme" sanding on the edges.  This helps add a rustic element to the bears.
Base piece cut to 24" and bear supports. cut to 4"

Light post...30"


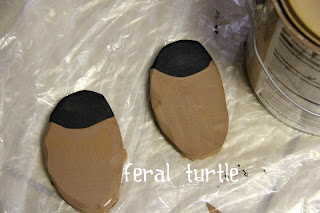
Paint all the details on the feet, nose, and bear body.

Paint the ears too!  OOPS  I forgot here!


I used real blush for that "I just worked out" look. 

Attach the nose, screwing from the back. 

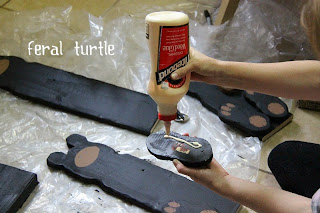
All the screws are invisible from the front.  I attached the bear to the base block from the front, and then attached the feet from the back.  The feet cover the screws that attached the bear body  to the base block.  Hope you followed that cuz it made me dizzy just trying to type it!

Where are their ears? OOPS!!


Here they are.


Paint the lines in the ears too.


After distressing the bears and post, you might want to add some stain to the distressed areas to darken them.  Also, another boo boo here.  You will want to distress the post and the bears prior to assembly.  I forgot to do this and had to squish my poor hands in and about their bodies.


Clear coat the bears with your choice of sealer.  I used a water based sealer and four years later, they still stand outside, every season......staring at me.

Measure the diameter of your solar light holder and drill a tight fitting hole on the top and center of the lamp post.  I like to drill at least 4 inches in for good support.  You can use whatever solar lights you can find.

  Winter is coming and they wanted matching scarves from Coco Chanel and that's what they got.  I quickly sprayed some Coco Chanel perfume on dollar store scarves!


Don't stare at the bears cuz it makes them nervous and then it makes me nervous.  I still get nightmares from my little bear army!

Hope you like them!
Cheers!


                                                                Linking Up With


Visit thecsiproject.comIhookedupwithHoHlamespice
The 36th Avenue
shabby creek cottage
Funky Junk's Saturday Nite Special

Home Stories A2Z
Making
http://www.thethriftyhome.com
Photobucket