I had been surfing the blogs one day and came across an awesome idea for cute little flower girl dresses. I quickly emailed my daughter the link, which you can see if you CLICK HERE. The blog where I found the idea, has an amazing seamstress, which I am not, but she made the concept so easy for me that I figured even I could muster my way through it! The bride to be (my daughter), decided it was an awesome idea; pillowcase dresses. After finding the perfect pillowcases, I sat down at my machine and started to sew. The one I took pictures of is the second one. The first was already shipped off for a trial fitting.
Cheers!


 |
| I started by folding the pillowcase in half. |
 |
| Cut out the armholes. Also trim off the seam on the top of the pillowcase. |
 |
| It should look something like this when you unfold it. |
 |
| Press the armhole seam. I double folded to make a neat finished seam. |
 |
| Stitch each armhole. |
 |
| Press the edge over for the top of the dress. Stitch. |
 |
| Press over again creating a pocket for your tie to slide through. |
 |
| Stitch down. |
 |
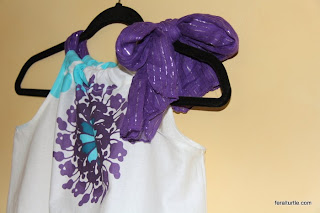
| You can make a tie from your own fabric or you can just use a scarf like the one above or maybe a piece of ribbon! |
 |
| One side will tie into a bow, and the other side creates the strap that sits on the shoulder. |

 |
| Hopefully we will get some cute shots on the big day with actual models in them, but for now, you can enjoy my stunning new hangers! They feel like velvet! |
Cheers!