Showing posts with label boxes. Show all posts

Saturday, April 12, 2025

A new housing community made from pallets. Part One

This is part one in my quest to create some fun and virtually maintenance free deck planters for summer.

My plan is to hide four plastic barrels which will be turned into wicking bed planters. (Post coming soon)


I found a really heavy duty pallet in my stash and cut equal lengths off of each end (19").  This will be the height of the planter facade and also the front and back.  


 Using the boards from the underside of the pallet,  I cut the width I needed which turned out to be 22". 


 The  finished measures will be 48" x 23 1/2" x 19" high.  

I assembled it in place but made it so I can disassemble for the long, cold, bleak, did I mention long winter months of shovelling snow and more snow and lots of white stuff off the deck.


The two half barrels were placed inside to make sure it all fits.
I actually redesigned my ends after assembling the one above.  I wanted to be able to disassemble the box for storage in the winter and have the houses come right to the edges.    I added two 2x2s and secured them with one screw into the 4x4s.  That way the houses can all stay put and I can easily remove the sides.  See photo below
This is the second planter using 2x4s and 2x2s 


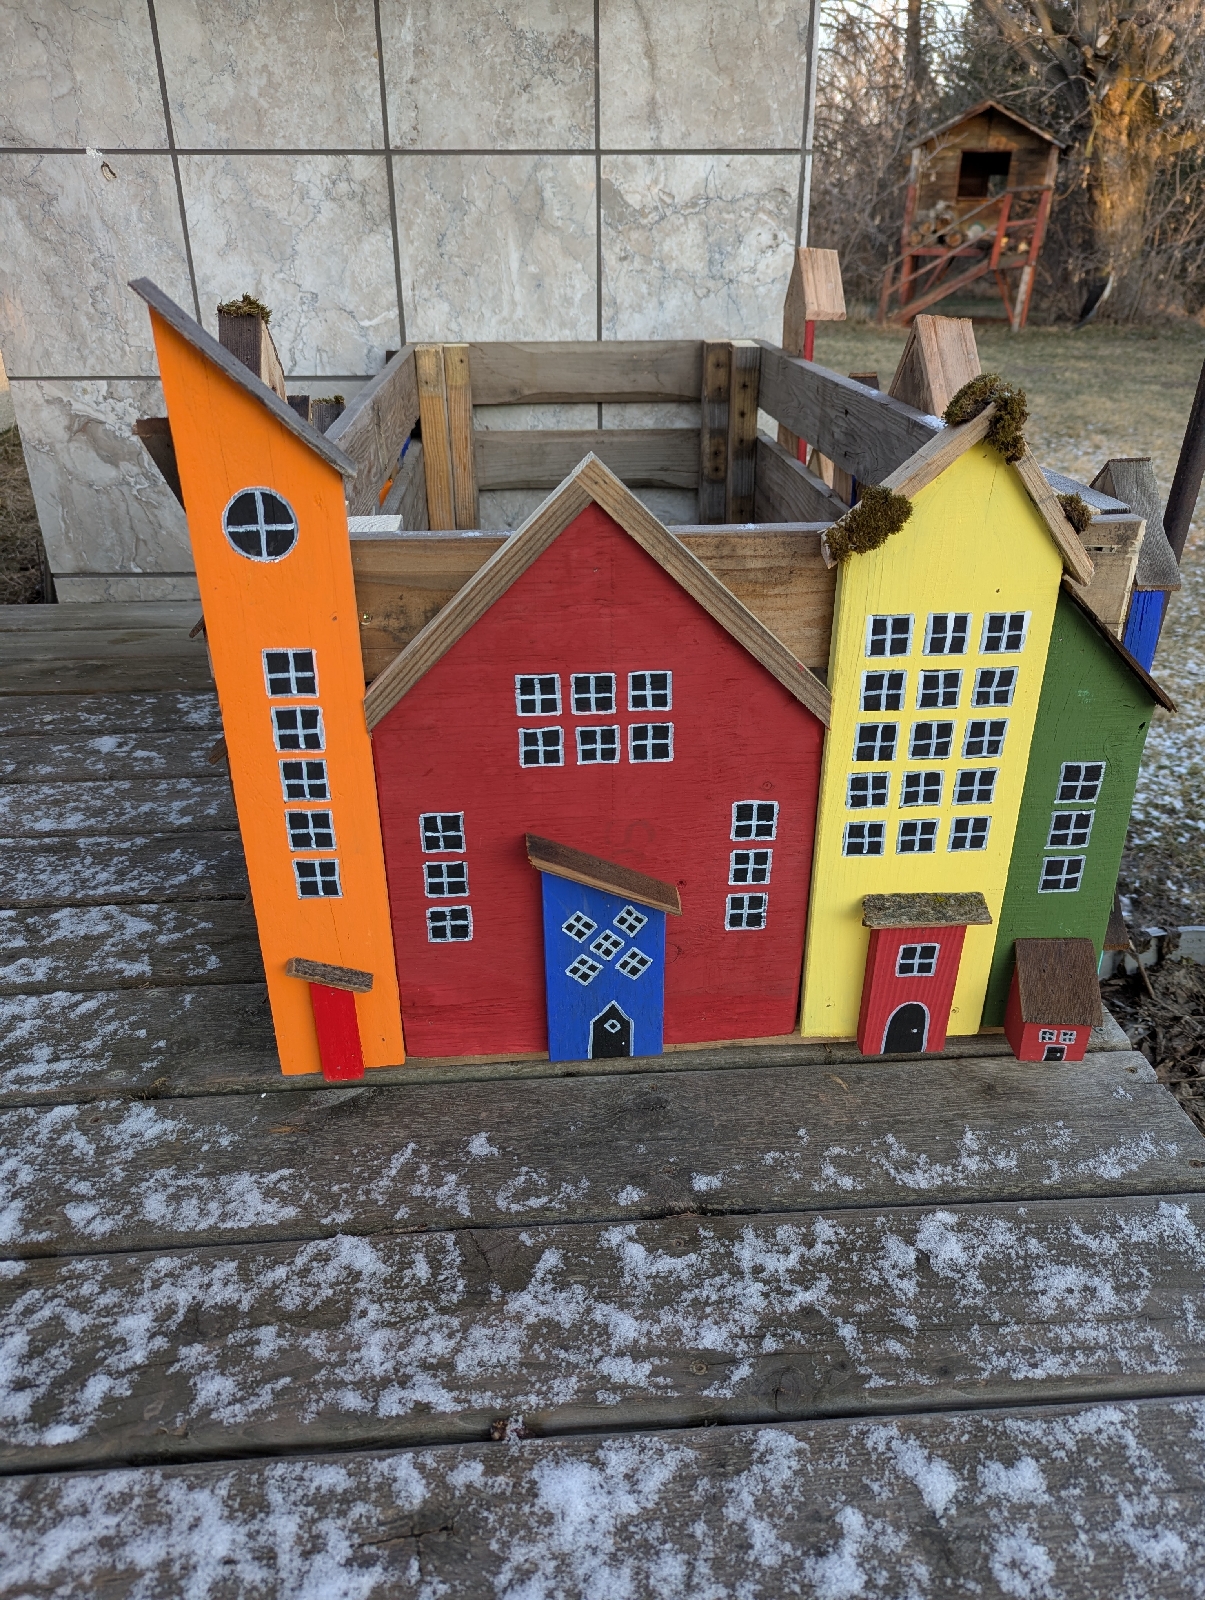
Next on the list was to cut different shape houses.  All the wood was pallet scraps or cutoffs from previous projects.  I created a hodgepodge of different shapes and painted them using dollarstore paints. 


An oil based paint marker came in very handy for windows and doors!
I outlined black painted windows with a white marker.


and voila, a new community was in the works!

That is the last remnants of a snowstorm we had. 

 Hoping for one more before spring flowers.


I air nailed the houses to all four sides of the planter facade.


Next step will be the wicking bed planters which will sit inside the new housing development.  This community should be nearly maintenance free for the summer, with only a good watering once a week! 

You can view part 2 here. 


Cheers!


Saturday, January 11, 2025

Wood Pellets for Kitty Litter

Last summer, we were blessed with an unexpected visitor.  She graced us with her beauty and song.  She picked our house, and tagged us as her people; aka roadies. 

 Her name is Stevie Nicks.

As per contract, Stevie demanded her own couch.
 

Stevie having a quick bite.


A month or so later, Stevie brought her fans.


Meet Elton John


They settled right in, making themselves at home. 

We were being pushed out of our once quiet home. 

 Chaos prevailed.   


  The whole situation became a little costly and quite frankly, smelly.  Who would ever think that these adorable  bundles of fur could produce so much POOP.


After a little research on the internet, some persistence and encouragement from her roadies, a switch from traditional cat litter to horse bedding happened.  The smell isn't as bad, and cleanup is quick.  A few scoops a day into a diaper genie, and a bi-weekly trip to the compost area is all we need. Cats like a clean area to do their business!  This is the only method the babies know.  


Here's how I did it.

I purchased two same size totes.  One was flipped over and many, many, many  holes were drilled with a 1/4 inch drill bit.  I could have laid them out neatly but freestyle seemed quicker.  

Scrap pieces of 3 1/2" boards were cut to length.  The boards fit between the nubbins and under the rim on each side.  If you decide to make your own, measure the nubbins or any obstructions for your overall length. These boards act as a spacer  to create a larger gap between the two totes for the sawdust to settle.  This way I don't have soggy spacers sitting in the bottom of my tote. 


 When stacked together, with the spacer in place I measured out the entrance.  I decided to put mine on the end as these little rock stars seem to have long bodies.


 I used a jigsaw and then sanded any burrs that were left. The YouTube video that I watched for inspiration, (I will leave a link here),   said to sprinkle pellets on the bottom to capture any urine that makes it way down.  This is a great idea. Stack the holy tote on top and put a good layer of pellets in there.


This is the 40lb bag for 8 bucks I buy


When I clean out the poop,  I use a large yogurt container and a pooper scooper.  I leave the pellets behind and grab the browns.  They get tossed into a diaper genie and then disposed of when  full.  The pellets are stirred with the pooper scooper, or you can shake the holy tote so the sawdust falls to the bottom.  After a week or two or three, I empty the bottom out.  There is very little odor with this method.  The urine turns the pellets to sawdust and you smell wood.  I add a yogurt container of pellets maybe once a week or when I notice the level is getting lower.  

On a high note, Stevie's a$$ used to hang over the side of her purchased litter box, missing it altogether.  The tall sides of the tote eliminates this.  NO MORE BROWN NUGGETS ON THE FLOOR!!!


Stevie's wandering ways were put to an end.  A week of dressing in cones and lovely pink onesies couldn't end soon enough for this fashionista.

..


After a few more months, two of the crazies found a lovely home where they too will be treated like rockstars.  Only a five minute car ride for frequent visits.

Lastly,  PLEASE don't drop your pets off in rural areas.  It's cruel and hell will come for you!

Cheers!