Showing posts with label greenhouse. Show all posts

Saturday, April 12, 2025

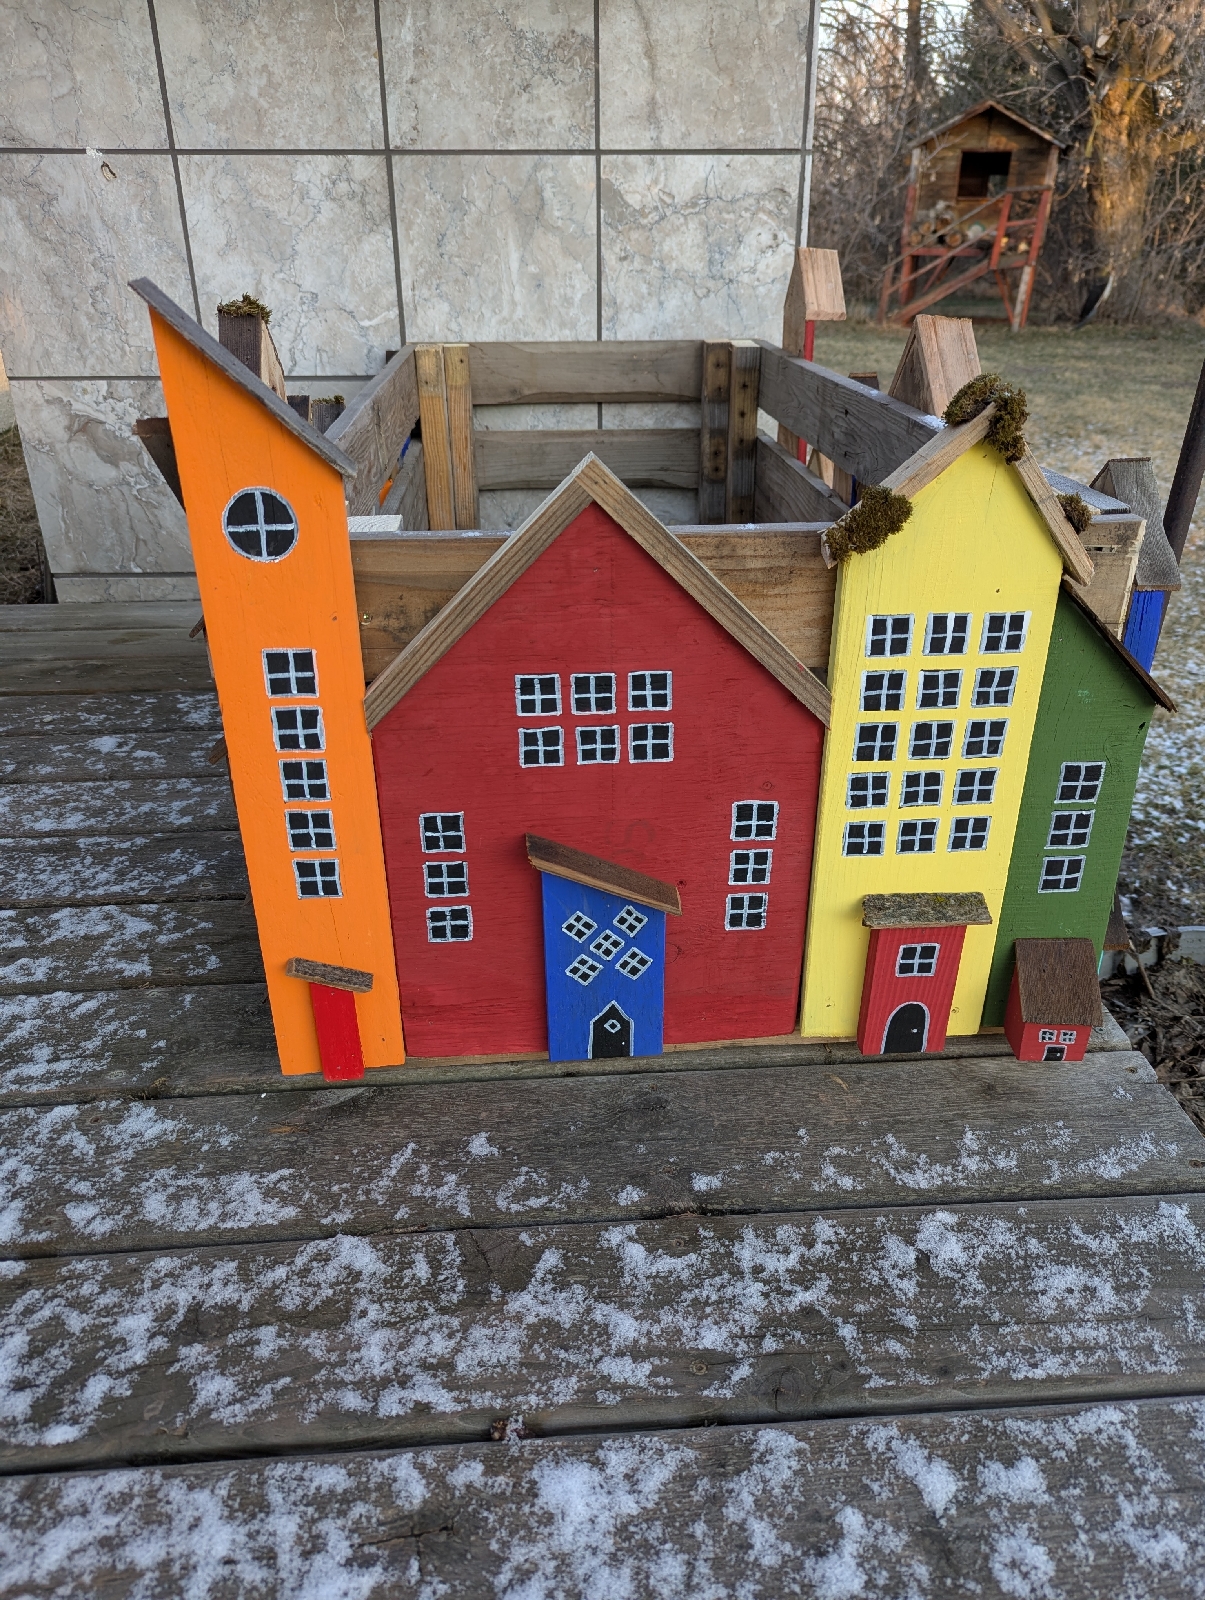
A new housing community made from pallets. Part One

This is part one in my quest to create some fun and virtually maintenance free deck planters for summer.

My plan is to hide four plastic barrels which will be turned into wicking bed planters. (Post coming soon)


I found a really heavy duty pallet in my stash and cut equal lengths off of each end (19").  This will be the height of the planter facade and also the front and back.  


 Using the boards from the underside of the pallet,  I cut the width I needed which turned out to be 22". 


 The  finished measures will be 48" x 23 1/2" x 19" high.  

I assembled it in place but made it so I can disassemble for the long, cold, bleak, did I mention long winter months of shovelling snow and more snow and lots of white stuff off the deck.


The two half barrels were placed inside to make sure it all fits.
I actually redesigned my ends after assembling the one above.  I wanted to be able to disassemble the box for storage in the winter and have the houses come right to the edges.    I added two 2x2s and secured them with one screw into the 4x4s.  That way the houses can all stay put and I can easily remove the sides.  See photo below
This is the second planter using 2x4s and 2x2s 


Next on the list was to cut different shape houses.  All the wood was pallet scraps or cutoffs from previous projects.  I created a hodgepodge of different shapes and painted them using dollarstore paints. 


An oil based paint marker came in very handy for windows and doors!
I outlined black painted windows with a white marker.


and voila, a new community was in the works!

That is the last remnants of a snowstorm we had. 

 Hoping for one more before spring flowers.


I air nailed the houses to all four sides of the planter facade.


Next step will be the wicking bed planters which will sit inside the new housing development.  This community should be nearly maintenance free for the summer, with only a good watering once a week! 

You can view part 2 here. 


Cheers!


Saturday, August 24, 2013

Building a Greenhouse From Recycled Materials - Part Two


And let the sunshine in!


If you would like to see part one of the greenhouse structure CLICK HERE.  It shows how we recycled two old falling apart car tents into a frame. 
Framing the door was quite easy.  Notice the little pepper plants already in their new home?  The bottom brace on the door where the arrow points on the right is temporary.

Door frame is attached using aluminum.  We had some aluminum pieces in our scrap pile and cut it into strips, drilled holes big enough for screws to go into the wood and a bolt into the metal tubing of the greenhouse frame

Wood is all given a coat of white exterior paint.


Recycling a steel door is a lot of work!  But totally worth it.  We saved it from the landfill!


Wooden frame is cut out of a sheet of OSB and thoroughly covered with white paint.
Wood is attached using bolts.  We drilled through the wood and metal frame, put bolts through the wood into the metal frame and secured on the inside with nuts and washers.


Door hinge area is chiseled out.

Door attached,  View from inside.
Even the door latch was recycled.

OSB is also painted on the outside now.


Wrapped in plastic.  This stuff is so tough you have to cut it with an olfa knife.  It wont tear!   We bought our plastic from Northern Greenhouse. http://www.northerngreenhouse.com/ 
We haven't put a fan in yet and will wait until  the industrial fans come on sale.  Vent door to the left and full sized door to the right, are opened every morning.  Seems to provide enough ventilation for now.

We secured the plastic using plywood strips that were ripped from a four by eight sheet. 
 We cut the strips at 1-1/2 inches, routed all the edges and pulled tight to keep the friction to a minimum.  Plastic was wrapped around the strips and screwed to the wooden foundation, the shed and the OSB on the front of the greenhouse.


We have had the greenhouse up and running for two weeks now.  Just took me this long to edit and post.  The tomatoes and peppers have improved so much since being brought into the greenhouse.  Next year will be even better.

Strings attached to rebar in pots tied to the frame of the greenhouse in hopes of copious amounts of tomato production!  We  can only  hope !


Our watering system.  We collect water in a large tank from the garage roof, and pump it into barrels.  Hopefully this water will heat up in the daytime and add a bit of heat into the cold fall nights.  The white barrel stores water with added fertilizer.  We can fertilize all the plants once a week.  We may paint all the barrels black!

A pathetic little cherry tomato, purchased from the (HELP ME!! NOBODY GIVES ME WATER  clearance rack ) has finally started to smile :)


Bought a spiffy new thermometer. 


A late start for this year.   We've eaten lots of baby red peppers and cherry tomatoes and  have used many of the herbs for cooking.  We also planted a zucchini in the ground to keep it frost free and perhaps with any luck,  we can eat zucchinis into late fall.  I feel healthier just looking at all these veggies!

Cheers.

Monday, August 19, 2013

Greenhouse Equals Greenthumbs? Building A Greenhouse With Recycled Material


I Got Sunshine.......On A Cloudy Day!

We will soon be frolicking in our shiny new, built from mostly recycled materials, greenhouse.  After purchasing the plastic about 15 years ago, having it sit in the rafters of an old shed being pooped on from mice, flies and the likes, it was put to use!   Granted, no sunshine, rain or snow have touched its skin, but it was still  in pristine condition.  We ordered double the size and our plan was to build a greenhouse for my mom, which we did, and one for ourselves, which we didn't.   Amazingly enough, the one built for my mom still has the plastic intact, but with its few scars and rips, it has been long abandoned as a greenhouse.  It was fabricated from round bar connected with  little doodad connectors that Mr FT created. 

You can check out the plastic here if you are interested.
The website owner builds greenhouses from rebar, which is where our original greenhouse idea came from with a few modifications.
Needless to say, we just never got around to the heat and sweat  joy of a greenhouse.  Then one day, when cleaning up a tired car tent, purchased from Costco, and another car tent we inherited for our daughters wedding, you know, the big ones that are 10x20 feet, we had this brilliant idea of merging the two frames into one fantastic, super marvelous, steroid tomato growing greenhouse. 
 Easier said than done, but with that said, it's done.


An old fence built from Douglas fir timber was recycled into a foundation.

We used two layers of timbers with staggered joints.   They were glued and fastened together with lag bolts.   Rebar was pounded through the timbers into the ground to keep them in place.


The first frame piece was anchored to the wall of an old shed and screwed to the timber base.

We decided to use a white end tee here instead of the cross so that Mr FT could work his magic and fabricate an out of whack cross tee to join the brown frame to the white.  

He used a leftover piece of the tubing to weld into place.

Mr FT workin his magic!

An "out of whack" tee and a sneak look at the plastic...and a crappy paint job by yours truly!


  Hopefully you don't have to wait fifteen years to see the finished results. And just maybe, I will grow some green thumbs.
   

Cheers!!

Linking Up With