Using a recycled sonotube to make a stool!

A while back, I made a Wine Rack From a Sonotube.
But of course you can't buy just enough Sonotube, you have to buy the whole piece which was like a hundred feet long in Metric, but in Imperial, I think that measures twelve feet.
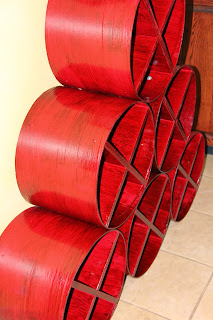
My answer for the excess was to make Recycle Bins.. I made two. One for metal cans and the other was for bottle depot cans and milk jugs.

The metal can recycle would never fill up and the bottle recycle bin would be overflowing. So I repurposed the metal can bin into a stool.
I spied on Pinterest, a lovely ottoman, which led me to sacsfifthavenue.com where I found a whopping price tag...$1729.89 CAD Yikes!!!
Plus they don't deliver that item to Canada....such a shame....
The piece is from The MacKenzie Childs Collection at Sacs Fifth Avenue.com

Gorgeous!
I made this stool back in September, but I was never totally happy with it. Although I had all the supplies I needed, right there, in my craft room, it was never "The Feral Turtle Child," that I had pictured in my mind. My goal was to make it whimsical like the inspiration stool.
So the first one we will call "The Practice Run".
I cut the tube to 14 inches. With the casters and foam added, this would give me the chair height needed for my vanity stool.

I cut the top and bottom from melamine that was used to build our Concrete Vanity.

I also cut three 2x2s to 12 1/2 inches for inside braces.

The bottom round went inside the tube. It was a nice tight fit.

I placed the 2x2s inside and screwed them to the inside of the tube.

The top was inserted and a screw was attached to each of the 2x2s from the top and the bottom.

And now, ready for upholstery.
Batting was wrapped and stapled around the exterior of the form.

I cut a foam round from a recycled couch cushion with my trusty "Foam Eater", an electric knife.


I measured my fabric pieces and cut,

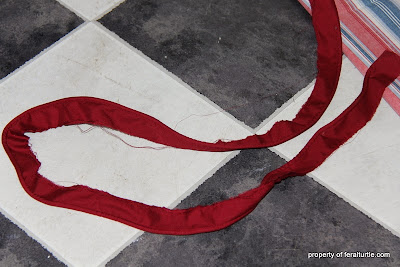
and then sewed some welting a.k.a. piping, for the edge.
All the pieces were sewn together!

I covered my foam seat with recycled batting from our old couch. Spray adhesive was used to keep it from sliding around on the foam.

 .
.
The fabric was pulled over the top and then secured at the bottom using staples.


I was able to use some casters that I salvaged from somewhere???

I divided my stool into four equal spaces using string.
 I divided each length of string into the closest I could get to 8" spacing. It worked out to 7 1/2" spacing; thus creating an equal distance between each tack around the stool. Using chalk, I marked every 7 1/2 inches around each string line and nailed tacks to each point. The middle string line was staggered to mimic a diamond pattern. I attached the ribbon in a diamond pattern.
Not as pretty as my inspiration piece, but free!!

Plus they don't deliver that item to Canada....such a shame....
The piece is from The MacKenzie Childs Collection at Sacs Fifth Avenue.com
Gorgeous!
 |
| From the workshop of the Feral Turtle.....not so gorgeous. |
I made this stool back in September, but I was never totally happy with it. Although I had all the supplies I needed, right there, in my craft room, it was never "The Feral Turtle Child," that I had pictured in my mind. My goal was to make it whimsical like the inspiration stool.
So the first one we will call "The Practice Run".
I cut the tube to 14 inches. With the casters and foam added, this would give me the chair height needed for my vanity stool.

I cut the top and bottom from melamine that was used to build our Concrete Vanity.

I also cut three 2x2s to 12 1/2 inches for inside braces.

The bottom round went inside the tube. It was a nice tight fit.

I placed the 2x2s inside and screwed them to the inside of the tube.

The top was inserted and a screw was attached to each of the 2x2s from the top and the bottom.

And now, ready for upholstery.
Batting was wrapped and stapled around the exterior of the form.

I cut a foam round from a recycled couch cushion with my trusty "Foam Eater", an electric knife.


I measured my fabric pieces and cut,

and then sewed some welting a.k.a. piping, for the edge.

All the pieces were sewn together!

 |
| At this point I get an F. I should have clipped my seam around the circle to relieve the curve. I didn't do this on "The Practice Run" ottoman, which caused it to pucker. |
I covered my foam seat with recycled batting from our old couch. Spray adhesive was used to keep it from sliding around on the foam.


The fabric was pulled over the top and then secured at the bottom using staples.


I was able to use some casters that I salvaged from somewhere???

I divided my stool into four equal spaces using string.

Not as pretty as my inspiration piece, but free!!
"The Practice Run"
My hunt for the perfect fabric, at a reasonable price, had ended.
I was able to purchase both fabrics from the clearance section, and the trim at half price!
My cost for "The Feral Turtle Child" was about $12.00.
I followed the same steps as above for most of this stool except I added fabric covered buttons and skipped the ribbon. Instead of casters, I decided to upcycle some old furniture legs. The top piece of wood was cut from leftover melamine, and the bottom piece was a cupboard door from the old kitchen. The foam was recycled from our old couch.


Cheers!
Linking Up With
Young Heart
My hunt for the perfect fabric, at a reasonable price, had ended.
I was able to purchase both fabrics from the clearance section, and the trim at half price!
My cost for "The Feral Turtle Child" was about $12.00.
I followed the same steps as above for most of this stool except I added fabric covered buttons and skipped the ribbon. Instead of casters, I decided to upcycle some old furniture legs. The top piece of wood was cut from leftover melamine, and the bottom piece was a cupboard door from the old kitchen. The foam was recycled from our old couch.

 |
| I secured the batting to the top piece so it wouldn't slide down when I pulled the cover into place. The side of the foam and Sonotube were batted in one piece versus the two pieces I used on "The Practice Run". |
 |

 |
| Stapled neatly to the bottom, just as I did the first stool. |
 |
| No puckering! Just from snipping the seam around the circle. |
 |
| Made eighteen fabric covered buttons. |
 |
| I hammered upholstery tacks in an evenly spaced staggered pattern and hot glued my buttons over top of the tacks. |

 |
| Legs were base coated in white. |
 |
| and finished in a checkerboard pattern. |
 |
| I drilled holes the depth and an exact diameter of the nuts to ensure a snug fit. |
 |
| Mixed up a two part epoxy and |
 |
| added the epoxy to the hole. A bolt was inserted into the nut so that it could he hammered safely into the proper position. |
 |
| Nuts were left to cure in the epoxied hole. |

 |
| As soon as the epoxy was cured, the legs were screwed on..... |
 |
| and my $12.00 stool is born! |


Cheers!
Linking Up With
Young Heart


Featured At


